Wednesday, February 28, 2007

Round Tab Punch Part III

Hello Ladies,
Here is a chart of Ideas from a lady name Judi(thanks Judi for sharing). Enjoy!
  • ROUND TAB PUNCH IDEAS
    Make tabs (using SU color cardstock) for cardstock file folder tabs. These could be stapled on the folder.

    Make catalog section tabs from color cardstock for your customers.

    Make a fun business card by creating a Rolodex business card with a tab.

    Make dividers for lunch box tins.

    Use your extra set of catalog tabs (SU sent a while back) and place them over punched cardstock. Add snail adhesive to the back side of the tabs and attach to catalog.

    Make magnetic cookbook page tabs. Put a small magnet on the bottom of the tab to reuse them, like the book markers Make labels such as 'dinner idea', 'family favorite', 'snack idea', etc. Tab your favorite recipes or ones you would like to try!

    Make alphabetical tabs for address books using designer paper. Use the tab punch to make each letter tab. Stamp the letter on the tab using one of the SU alphabet sets.

    Create interactive scrapbook tabs – use punch to make pull / open tabs.

    Make sticker tabs from a full sheet sticker labels (the ones that don't have any labels cut out of them--just a full sheet of sticker) or run a sheet of paper through a Xyron.

    Use up your stash of scraps from cardstock and designer papers. Make a bunch of punched tabs, put ten of them in a cello bag, make a topper and give them as little door prizes.

    Make small & large brackets by punching once through your cardstock using the side of the punch. Then punch again in the same spot moving the punch over slightly. You can make the brackets as thick as you'd like them depending on how far over you move the punch each time. This makes a longer bracket than what I used on my card. I trimmed the ends off so it would be shorter. The longer bracket would be great for larger letters or sayings.

    Create scalloped edges. Use the very top of the punch - the round part only. Looking at the back, metal side of the punch, insert the paper only up to where the rounded part stops & the straight part of the tab starts (about 5/16") and punch. Move it over and punch again. It's just like the slit punch in a way.

    Make removable tabs using 2-way glue Item 100425. Let glue dry before sticking the pieces together. These could be used by customers to mark pages in a catalog.

    Create design elements by using tabs on scrapbook pages and cards.

    Put thin magnets inside the tabs used at workshops to mark pages that customers are interested in items. Use them yourself to mark pages temporarily with the sets used in projects, etc. Use them as a booking incentive.

    Laminate tabs with mac-tac or contact paper. Or if you have a Xyron, use that.

More with Round Tab Punch

I have to tell you, I am glad we have computers and such access to all these neat stamp sites and groups. Here is a chart that was done by a lady on SCS. Is this not awesome or what????


Hope you enjoy this, I will have more to follow on the Round Tab Punch.

Have a lovely day,

Deb

Tuesday, February 27, 2007

Making Brackets with round tab punch

Ladies,
I just saw this posted on a yahoo group and had to share. I love to read so many things from so many talented ladies. This is another great reason to buy the round tab punch.

Thanks Marissa for sharing this.
Not only can you use it as a index tab punch as it was made for but you can also make some adorable brackets also! Oh what fun you can have with this punch!


My 2007 Calendar Card


Thanks to Hetty I created this calendar. I really like the way it turned out.
Here are the directions & Template from Hetty.


For the background I used the shaving cream technique. I found this on SCS.

Here are the directions so you can do it too. If you do not belong to SCS you need to join.

It's such a great site for ideas.
Here are the stamps I used. Stamps: Season by Season, Polka Dots & Paisley, Happy Harmony

I did this about 2 months ago and the paper still smells like shaving cream...lol. I did a drawing at a few of my classes and you got a chance to win one of these. I was going to teach the shaving cream technique, its fun to do but it takes a day to dry so you can’t use the paper right away.
Hope you try this card or technique, both were so fun.
Have a nice day.

Deb

Monday, February 26, 2007

Spring Swap Cards from Diane

Here are 3 lovely cards from the same lovely lady that joined my swap. I love all 3 cards. Now I have to get Doodle Alphabet…lol
I love doing swaps, and looking at creations from so many talented ladies. I just wish I had customers that wanted to buy as many stamps sets as I do….lol . I will be showing more cards from my swaps later this week. I think so many talented ladies cards are just not viewed cause so many just don’t post their incredible work. I learn so much from all these talented ladies. To all the ladies that join my swaps, thank you!!
I really really enjoy doing swaps and getting your cards and sharing with all the other ladies out there. Please keep it up!
Two current swaps I have going on right now are
1. Faux Postage Card Front Swap
2. Vintage 6x6 double page layout swap

Let me know if you are interested in doing either and I will send you the details. Heydeb@yahoo.com

Happy Card
Stamp sets: doodle alphabet, mixed bouquet
Cardstock: confetti white, apricot appeal, certainly celery, regal rose
Ink: regal rose
Markers: regal rose, certainly celery, apricot appeal/summer sun
Dazzling diamonds, and rose and certainly celery ribbon.


Thanks Card
Stamp sets: doodle alphabet set
Cardstock: pretty in pink, barely banana, confetti white, petals & paisley design paper, window sheet.
Ink: black stazon
Markers: tempting turquoise, yo yo yellow, pretty in pink, old olive
Lt. pink GG ribbon, pretty in pink brad, 1/16” circle punch, spring bouquet flower punch, 1 ¼ “ sq punch, 1 3/8” sq punch


Happy Mother’s Day Card
Stamp sets: office accouturement, all year cheer I
Cardstock: Barley banana, tempting turquoise, confetti white
Ink: tempting turquoise
Notations designer paper
Gold brads, round tab punch, 1/16’ punch, stampin’ dimensional, stick strip tape.

I just want to say Thank You to Diane, and all the ladies that took the time to do my Spring Swap and all my swaps. I am so happy to know you ladies that take the time to do my swaps and to the ladies that share your work via yahoo groups and your blogs.
Have a lovely day
Deb

Sunday, February 25, 2007

Love it Atc card


Hello Ladies,

I cased this Atc from Jane B. I am going to SU Regionals in April in Virginia Beach and this is just one of the swaps I am doing for it. I’m working on 40 of these. I embossed this with the matching Love it Stencil. I also used the Petals wheel from the spring mini. I taped the two pieces of green together on the backside and wheeled with versamark across the both greens. I also used Warm Words stamp. I will be working on another Atc card with cool cat on it. I will have to post a picture of that one later. I am not sure what else I will be doing for VAB Regionals, but I will surely share it when I’m done.

Hope all are doing well and you didn’t get too much snow where you are. We are in Charles Town, WV and got a lot of snow.

Take care,
Deb

Saturday, February 24, 2007

Why to buy Craft Spots


This was posted on StampinUpfriends@yahoo.com
I just felt this was something good to share and that more ladies should read it.

Why to buy craft spots - by Trish

1. Stamp with them. Craft spots are the same as pigment ink. A wetter ink than dye(Classic) ink.

2. Stamp in your scrapbook. Dye ink fades over time. Pigment ink is considered more permanent and will fade less over time. Craft spots are acid free!

3. For Wet embossing... all you need is clear embossing and you have 48 colors of embossing with the full set of spots.

4. Spots transport better for stamping on the go. Are small and come in their own box.

5. Spots take up less storage space.

6. Spots actually can be less mess for the ones of us that are all inky fingers.

7. Spots are great for special techniques like direct to paper.

8. Spots allow you try craft ink without a big money commitment especially on sale.

9. Spots can be reinked just like a full size pad

10. Spots allow you to multicolor background stamps a technique that is difficult to impossible with full size pads (I know I tried after I saw this at convention.

11. Spots are the perfect size for alphabet stamps (a great scrapbooker tool)

12. I would assert from personal experience that a spot can do just about anything a full size pad. The spots I have already purchased I have been very happy with.

Disadvantages of Spots.

1. Less surface for inking means more time with inking stamps.
2. Spots need to be reinked sooner than pads.
3. Some people are messier with spots than pads.(have seen this from others.)
4. Spots can leak if not stored properly
5. Have heard a few complaints that spots are juicy enough..but do not know this from any personal experience.
6. For heavy use pads are probably more durable for daily use.
7. If spots are stored away from work area you probably won't use them.
8. If you fall in love with craft ink you will most likely desire to upgrade to full pads.

Remember these are my opinions..be that what it may. I really wanted to get myself a set and debating this purchase.

For demos it might be a great hostess reward to buy a set this cheaply and break it up as little gifts with an incentive stamp for bookings or great workshops.

Trish


I would like to add to this, besides all the above information, my idea, is you can take all your stamps to a crop and they will not take up much room. I think the spots are great for crops.
Have a nice day and thanks for reading my blog.
Deb

Friday, February 23, 2007

Want to Join my Faux Postage Card Front Swap

Good day ladies,I have two other pictures of faux postage cards to share. Here again is the link to SCS, so you can make a faux postage card too.
I am doing a swap for the Faux Postage Technique, let me know if you would like to join. Heydeb@yahoo.com Deadline to sign up is March 1st. Count is all+1 (max of 9+1 per group)

This card is by Patricia L. Here is the recipe:
Stamps:
ALL WRAPPED UP ACCESSORIES STAMP SET
MINI MATES STAMP SET
TREAT YOURSELF STAMP SET
Paper:
CARD STOCK LAVENDER LACE 8 1/2X11
CARD STOCK REGAL ROSE 8 1/2X11

Inks:
CLASSIC STAMPIN PAD BARELY BANANA
CLASSIC STAMPIN PAD GABLE GREEN
CLASSIC STAMPIN PAD YOYO YELLOW
CLASSIC STAMPIN PAD REAL RED
CLASSIC STAMPIN PAD CLOSE TO COCOA
CLASSIC STAMPIN PAD SO SAFFRON
CLASSIC STAMPIN PAD PUMPKIN PIE
CLASSIC STAMPIN PAD APRICOT APPEAL
Accessories:
RIBBON ORGANDY WHITE 3/8 INCH
WATERCOLOR PENCILS
BLENDER PENS
SPONGE DAUBERS
UNI-BALL SIGNO GEL PEN
WRITE ME A MEMORY FONT CD VOL I

Created by:
PATRICIA L


This card is by Karen M. Here is the recipe for this card:

Stamps:
IN FULL BLOOM STAMP SET
WONDERFUL WORDS STAMP SET
Paper:
CARD STOCK OLD OLIVE 8 1/2X11
CARD STOCK MORE MUSTARD 8 1/2X11

Inks:
CLASSIC STAMPIN PAD OLD OLIVE
CLASSIC STAMPIN PAD MORE MUSTARD
Accessories:
STAMPING SPONGES
RIBBON GROSGRAIN BLACK
Comments:
The faux postage lines and amounts were printed from a computer, then masked to sponge the colors in behind the bees.
Created by:
KAREN M


Ladies,
Even If you don’t join my swap, I would still love to have you e-mail me and show me the card you came up with after playing with this technique.

Have a GREAT Weekend…
Deb

The 12 Steps of Stampers Anonymous

I saw this posted a while back and saved it cause I got a good laugh from it. I'm sorry I don't know who to give credit to, but I really thought it would be cute to share.

#1-Admit you're addicted to ink, glitter and rubber
#2-Heat guns are part of your life routinely
#3 You approach your mailbox daily praying to find something (anything) from SU! and nothing from the credit card company!
#4 You hope to grab your UPS packages before anyone in your family knows you have ordered more SU! Stuff
#5 you check your email twice an hour while at work-looking for any stamp related items!!
#6 Your cat wears glitter and your husband takes 3 days to notice-(this could be child too, not just cat)
#7 swap preparation takes priority over dinner, laundry, sex.... (uh oh!)
#8 you have a cling-on SU! sticker in your car window :)
#9 Whenever you wear a material with a print on it, someone at work asks facetiously-"Did you stamp that" even though it's obvious you didn't
#10 You walk aimlessly up and down store aisles, trying to think of new surfaces and techniques for your next workshop and meeting demo-something that will WOW them all!!
#11 Your relatives and friends know that a visit to your home always includes a stop in your "home office" so you can show off your "wares" -- AGAIN!
#12 Anticipation of the new catalog compares to waiting to know the sex of your unborn child!!!!

Hope you enjoy this.
Deb

Thursday, February 22, 2007

Faux Postage Card


This card is from Chris Weiss She did this for my Valentines Day Swap. Chris used the Faux Postage Technique. I love this technique, I will have to dig out some pictures of the cards I have done using this technique. You can learn to do this at SCS.
Here is the recipe for Chris’s card:
Stamps: Butterfly of Happiness (from the winter mini available til Feb 28th), fancy flexible phrases (also in the winter mini) and Love swirls.
Cardstock: whisper white, pink passion, regal rose, vellum paper.
Ink: pink passion, pixie pink, basic black
Accessories: hodge podge hardware, rose grosgrain ribbon, glitter.

I am doing a swap of Faux Postage Technique.
Contact me if you would be interested. Heydeb@yahoo.com
Have a lovely day.
Deb

Wednesday, February 21, 2007

Spring Mini Swap Card


Hello Ladies,

I am doing a Spring Mini Swap right now. Here is one of the cards I received from my swap. This is from Liz Bassett.
Here is the recipe:
Paper: pretty in pink, certainly celery, so saffron, whisper white.
Ink: regal rose, certainly celery, basic black.
Stamps: Office Accoutrement, Paisley, Aida cloth, It’s your birthday.
Accessories: spiral punch, ½ inch circle punch, 1/16 inch circle punch, light pink grosgrain ribbon, celery grosgrain ribbon, light pink gingham ribbon, soft subtles brad, stampin’ dimensional, small paper clip.
I host a lot of swaps, if you interested in joining one of my swaps in the future, just contact me.

Deb

Tuesday, February 20, 2007

Creative things to do with your Monogram Stamp


Hey Ladies,
Here is a something I did for a 6x6 Monogram Swap.
I used the back half ot the Monogram. I Kissed the stamp with the
Floral background stamp in Chocolate chip. I think put it to the paper.
I also used the love stamp and stamped it in the “K”. I then mounted it on Chocolate paper. I really was happy with the way it worked out.
So ladies get out your monogram stamps out and play. See what you can come up with.
Deb

Spring Mini Swap


Hello Ladies,
This is a card front a lady did for my upcoming spring mini swap.
I love to do swaps. I do many, if you are interested in joining one of my swaps, please e-mail me and I will keep you posted on my swaps.
Thanks Adella for this lovely card.
Stamp set: Bundle of Joy.
Paper: whisper white, sage shadow, apricot appeal.
Ink pad: basic brown, sage shadow, apricot appeal.
Markers: barely banana, close to cocoa, sage shaddow
Embellsihements: white and taupe grosgrain ribbon, brass brads and stampin’ dimensionals.
This spring swap is closed.. and I am receiving now. I will post other cards, with the ladies approval….


****Hosting a New Swap****** Vintage 6x6 Double Page Layout
I will be hosting a new swap.. This is for a Vintage 6x6 Double page layout swap. The pages must go together.
Quantity is 5+1(that means a total of 12 pages) You will not get your own back.
This is just for Current SU Stuff(catalog and/or spring mini).
You must make coordinating page layout. Quality work, layers and emblishments.
Postmark March 14th. Contact me for full details or if you have any questions at my e-mail address
Heydeb@yahoo.com
Hope to have you join..
Thanks
Deb

Monday, February 19, 2007

What Ive learned about Watermarks.

I have read many things ladies have written about watermarks. I have included several things from several different ladies. You decide what is best for you and good luck with your postings.
Deb

First one comes from Jen P. jabs1898@yahoo.com This is actually posted on her blog. She said to share.
The program I use for watermarking is called IrfanView or I-View for short. Here is a short tutorial on how to use this program to watermark your cards or pictures.It can be downloaded for free at http://www.irfanview.com/ First is just the card


Next you draw a text box on the picture where you would like the watermark. All you have to do is click on the picture and draw. If you don't like where it is you can Undo the box.


Next you go to the Edit Menu and tell it you want to insert text into the text box. I have highlighted it here.
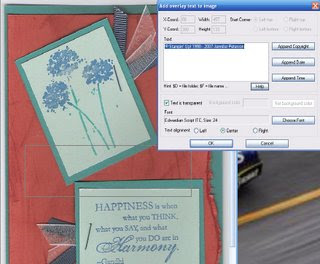
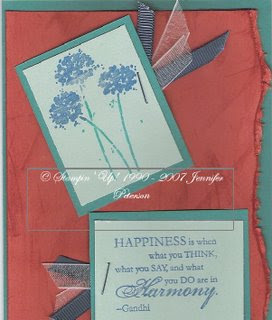
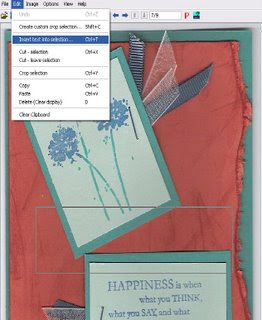
Then decide what you want the text box to say. Here I am typing in the text. If you want a copyright symbol just click on Append Copyright and it will show up for you automatically. No having to remember codes and using the ctrl button at the same time. Yay for that! As you can see here I have added my text and chosen the font. When you chose the font and font size is when you also may choose a color. I usually use Gray, Silver, or White depending on the card.

Finished Card with Copyright Information Watermarked on Photo!

Here is what Beth wrote:
you can do it through the paint program that comes with every Windows based computer. All you have to do is open the picture file in Paint then click on Text in the toolbar then click on Image in Taskbar unclick Draw Opaque (this make the text appear in a transparent box instead of a white one). Then type what you want - really simply. I have always used Paint for re-sizing and adding the copyright info on all my pictures, it is just so simply and no expensive program is needed. If you want to use an image you just need to have it saved on your computer and do the same thing. HTH
Blessings,Beth

Here is what Kim wrote:
The person who did my watermark is at this site:
http://imagine-dream-create.com/watermarks.html

I know I've recieved other info, but can not see to find it right now, if and when I do, I will post it. Hope this helps others get started... Happy Blogging Deb


Friday, February 16, 2007

First time playing with Watercolor wonder crayons

Hello,

Here is a card I did for a card swap I am in. This is my first time using the watercolor wonder crayons. Stampin’ Up sells them. You can buy them in 4 color groups. Bold brights, Earth elements, Rich regals, or Soft subtles. If you are interested in learning more about them contact me and I will share. For this card I used the Earth elements group.
I colored the stamp and then spritz it with water and stamped on to the paper. I did this a few times and loved the way the colors combined and looked good together.
Stamps sets I used on this card were:

Lovely as a Tree & Season by Season (both Stampin’ Up Stamps).


If you like to play with the crayon’s Pat Stamps has 3 free tutorials on playing with the crayons. Check them out. http://www.techniquejunkies.com/wc-tutorial/wc-crayon-home.html)

A lady name Cathy shared this recently and I copied it and wanted to share with others who love to use the crayons.

Cathy’s watercoloring tips:
· Watercoloring on different card stocks and watercolor paper produces different results. Experiment to find what works the best for your project.
· Cut your card stock or watercolor paper ½” longer and wider than you want the finished project and tape around the paper with blue painter’s tape to prevent warping.
· When watercoloring, let the water do the work.
· Use the Aqua painter or watercolor brush with the Watercolor crayons, rather than a blender pen; blender pens work better for blending ink or watercolor pencils.
· Scribble on a window sheet to create a palette of all the colors you want to use.

Cathy’s favorite techniques:
· Color directly on the stamp with your Watercolor Wonder crayons, spritz with the water, then stamp on wet watercolor paper.
· Blend color on watercolor paper or card stock using Versa Marker. Emboss image using crystal clear stampin’ embossing powder for the colors that pop.
· Watercolor a vintage image and then use the cracked-glass technique for a truly antique feel. See “Crackled” in September 2006 Stampin’ Up Success for the information on this technique(only available to demonstrators).
· Combine Pearl Ex with softened crayon shavings and a little water and brush onto the stamp to get an iridescent watercolored effect.

Hope you liked all what I shared with you and you will check my blog again to see what else I might have.
thanks for looking
Deb

Thursday, February 15, 2007

My second day as a blogger...

Hello,
Well I survived my first blog… I do like the color scheme, and the way it looks. I still have a lot to learn, but I am working on it. I wanted to share something I did this past Fall. This particular stamp set was featured in Country Living Magazine. Here is a link to see: http://magazines.ivillage.com/countryliving/decorate/projects/photo/0,,702630_702632,00.html?dst=rsscl The name of the set is Country Blessings but was sold as a whole kit with paper, stampin spots, ribbon and emblishments by Stampin’ UP as a kit called Autumn Elegance.

Below is a picture of a class I did using the set and also are the directions.


I used regular craft paint on the flower pot and painted ahead of time, so they would be dry for my class. I stamped with brown staz-on (rock & rolled method) and then just used a paintbrush and water-colored the pot.. I started using a blender pens, but it was easier and quicker using a paintbrush.
For coloring the leaves, it was really easy, they didnt look that good til they dried and blended... At first I didnt like them, now I do.. I brushed pretty much down the middle with the green then worked my way out with red, orange, and then a little yellow on the ends. I used the regular inks not the craft inks. I didnt want to have to worry about having to use a dryer and dry the pot. I also figured if I went over the lines(which I did) or I messed up completely I would just let it all dry and get out the craft paint I bought at the craft store and repaint the whole pot. I haven’t sealed the pot yet, not sure if I will yet or not... I guess if I really want to use it, I will.

I cased and added to all my stuff
the candle instructions I found on SCS(great free site)
http://www.splitcoaststampers.com/resources/stampedcandles.php
The card was cased from a swap I did, and I added the two oval punches so I could demonstrate them as well. The plastic bag with the 4 pieces in it are actually Hershey's nugget candies with regular mailing labels stamped and wrapped around each nugget. Then I stamped a topper and packaged the candies in it. The holder with M&M's its a door holder,(kind you put on the doorknob) and I folded it over and used it...Some thought this was a window card it was not.....
The little bag is actually a legal envelope and its called a bag-alope(cant seem to find the directions but last year I saw a video on it)... I made two from one envelope.

I hope you liked what all I showed and if you have the set, please feel free to case your ideas and send them to me. I would really love to see.
Take care,
Deb


Hello All,

My name is Deb, I am a Stampin' Up! Demonstrator.. I joined in August of 2005.
I live with my Hubby (Kevin) and two lovely kittens(Tux & Dc).

I am new to blogs and this is my first one. I've seen many ladies blogs and decided that I needed one too. I will be posting some pictures and directions of older stuff I did.. I think all will enjoy some of the past projects I've done..

In the fall of 2005, right after I became a SU Demo, I went to regionals in South Carolina. SU has many events like regionals where many ladies gather from all over and learn valuable business tips and new stamping techniques from Stampin' Up! staff. I had a great time! I didn't know anyone, but it didn't matter, everyone was so friendly and helpful. This coming April there is another regional event in Virginia Beach, Va and I am going.


For SC Regionals, I created many cards, 6x6 scrapbook pages, ATC(alternative trading cards). I swapped out all what I did and so many loved my ideas. I was so happy that others actually liked what I made.


I also made some pins. Here is a picture of them. I was very happy with the way they turned out. The stamp set is called "travel time" it is retired now, but a very cute stamp set.


Directions for making pins:


1. Stamp the image 3 times on white cardstock. Take the best image and color it. I used markers.

2. Cut out all the images out as a square and the same size.

3. Layer the images with the colored one on top. Turn over the top one and smear tacky glue onto the back of the image, then adhere to the second image. Smear tacky glue onto the back of the 2nd image and adhere to the 3rd image.

4. Cut out the image while the tacky glue is still wet(all 3 layers are glued together as one for cutting).

5. While the image is still wet, from the pin, and let it dry.

6. Use a marker(I used black) to color the edges.

7. Spray your pin 7 to 8 layers of Krylon Triple Thick Crystal Clear Glaze(until you get the shine you want). Let dry a little between coats. Let it dry completely and spray the back as well.

8. When dry attach pin or magnet.

Here are two of the swaps that I made to take to regionals. I used Cool Cat Stamp Set. I love that set, it reminds me of my little girl kitten.

I used Cool Cat, Haute Couture(retired), Fashion Statement(retired), I like your style(retired), A little Love, and Houndstooth stamp sets.

Well Ladies & Gents I think I am gonna post this entry and hope all that read it, enjoy it.

Happy Valentines Day

take care, Deb